Why, Hello There!

I truly believe food is love; it calms the soul, and lightens the heart. I am pleased you are here to share my many recipes, crafts and thoughts. Thank you so much for joining me, and may you always eat, drink, and be merry!

Saturday, July 6, 2013

French Raspberry Cream Macarons

Delicate, adorable, and delicious, these French Raspberry Cream Macarons were fun, and somewhat simple to make.  There were a lot of steps, but if followed closely, you too can make these beautiful macarons on the first try (like I did, yay!). I adapted the recipe from Entertaining with Beth, a great Vlogger on Youtube. You can play he video below to see her methods.  I did things a bit differently for mine, which the written recipe will reflect.
 

We love our local farmer's market, but one thing it's missing is a great bakery booth.  One of my wonderful and most endearing friends Hillary and I, will be attempting to start producing and selling pretty little desserts that use organic, local, fresh, healthful ingredients.  We want to use many ingredients that are being sold at other booths around the market.  What a fun way to use our passion for cooking, baking, and health, while bringing in a little extra cash.


French Raspberry Cream Macarons
*makes 24 completed cookies* 

Raspberry buttercream with a hint of orange


INGREDIENTS
3 Egg Whites (free range eggs)
¼ tsp cream of tartar (2 ml) * You can omit if needed, just may take a bit longer to reach stiff peaks but the recipe will still work)
¼ cup evaporated cane juice (organic sugar) (50 g)
 

2 cups organic confectioners sugar (200 g)
1 cup almond flour (120 g)
pinch of salt


RASPBERRY BUTTER CREAM
½ cup salted butter (120 g)
1 cup
organic confectioners sugar (75 g)
1 cup (150 g) fresh raspberries, worked through a sieve to extract 3 tbsp of juice
5 drops orange extract

Berries from a wonderful organic farm down the road!


METHOD:

Preheat oven to 275-300 degrees F

Beat egg whites and sugar for 8-10 mins. 
TIP: #1 eggwhite should be room temp. To create room temp eggs, submerge in warm water for 5 mins.

Whip until they form a peak that stands upright.

TIP#2 Sift almond flour, and powdered sugar. What remains will be the larger lumps of almond pieces. Just discard those, or use them to snack on :) You want a really fine powder mixture to create a smooth and pretty on top to your cookie.

Fold flour/sugar mixture into the egg white mixture. 
TIP#3 This is where all your hard work can really go wrong. Under mix and your macaroons will be lumpy and cracked when the bake with no feet, over mix and your macaroons will be flat and won't have feet, the mark of a well-made macaron. 65-75 turns of your spatula when folding is about the right amount of time.

Transfer batter to a pastry bag.

Pipe out 1 inch rounds on a baking sheet lined with parchment paper.

TIP#5: tap the pan hard at least 2-3 times to release the air bubbles. This will prevent the tops of your macaroons from cracking.

TIP#6 Let them sit out for 20--30 mins, or up to an hour if you want. This will allow them time to dry out a bit before hitting the hot oven. They should be "tacky" to the touch, but not stick to your fingertips. This is another important step to assuring your macarons develop feet! When they dry out they can't spread out in the oven, and are forced to rise up. That's what creates the feet!

Bake for 18-20 mins. DO NOT UNDER BAKE, even if they look done! Otherwise they will stick to your tray.

Pretty brown eggs


Meanwhile mix the buttercream. Whip butter with an electric mixer until pale and fluffy. Slowly add sugar. Then place sieve (if you do not want seeds) on top of a bowl the same size. Work raspberries through the sieve with a spatula, pushing them through, mashing them around until you extract their juice. You want 3 tablespoons of juice.

Add juice to buttercream, along with the orange extract, and whip until combined. Transfer to a pastry bag, fitted with a small tip (about ¼ " in diameter)

Reverse cookie shells on their backs, and pipe a small mound of filling on one of them. Top with the other shell.

If not eating right away, keep refrigerated. 

This beautiful plate came straight from Paris, thanks Hillary!


Bon Appetit!

Tuesday, April 30, 2013

Lasagna Mania!

So many tasty layers!


Hello, hello! I am happy to report that I'm proud of myself.  I finally accomplished a daunting culinary feat that I have wanted to try for a while.  I made pasta from scratch! Luckily it was surprisingly easy, just a bit time consuming.  And of course I used them in the most delicious way I know how: in LASAGNA! It took me a long time to complete the finished product, but goodness gracious was it worth it!

The way I came up with this recipe was by combining several different recipes, to make one cohesive dish. It is quite a large recipe (serves 24) so feel free to cut it in half or in quarters.

To make the noodles I did close to what this man did:  And I have to say it felt really neat being taught by an  Italian chef, plus he's completely adorable!  HINT: I recommend making the lasagna in this order:  sauce, cheese, then noodles.


 LINK: https://www.youtube.com/watch?v=twG7PCPDPEE 

For The Pasta:

5 cups flour
2 tbsp olive oil
6 to 8 eggs
2 tsp salt
*Extra flour if needed

-----------------------------------------------------------

Thoroughly knead dough together.  Roll it out by hand or with a pasta roller. For extra help watch and follow the video above. Boil rolled out and cut lasagna dough for 30 seconds to 1 minute, transfer to a cold water bath until ready for use. 

For The Bolognese Style Sauce:

1 large onion, diced
8 cloves of garlic, finely minced
2 carrots, peeled and thinly chopped
2 stalks of celery, thinly chopped
Salt and pepper
6 tbsp butter

2 pounds ground meat, turkey thigh works well

1 cup dry white wine

2 cups whole milk
Salt and Pepper throughout 

56 ounces (or about 4 pounds) crushed tomatoes, or excellent quality pasta sauce (you cheater!), or a mixture of the pasta sauce and crushed fresh tomatoes.

----------------------------------------------------------

Step 1: Cook prepared vegetables, seasonings, and butter for about 6 minutes, or until slightly soft.

Step 2: Cook ground meat in with the slightly cooked veggies, until almost all of the raw coloring is out.

Step 3: Pour in wine and let simmer until all the alcohol scent is evaporated out, test this by smelling it, about 7 minutes.

Step 4: Slowly incorporate in the milk while stirring, the mixture should be lightly boiling.  

Step 5: Add salt and pepper to taste throughout the cooking process. Add tomatoes and let simmer for about 5 minutes, or until completely cooked.
  
 *Add rux (equal parts oil & flour combined) into bubbling sauce if too thin. Add water if too thick.

For The Cheese Layers:

8 oz GOOD QUALITY Parmesan cheese(not the powdery stuff),grate 
8 oz fresh mozzarella, broken up 
16 oz full fat ricotta
4 oz cheddar, grated
Plus 2 oz cheddar, sprinkled on top
4 eggs
1/4 cup parsley, minced 

-----------------------------------------------------------

Grate Parmesan and Cheddar, break up Mozzarella into little bits, and stir in Ricotta, eggs and prepared parsley. Keep mixture cold until ready for use. 


For The Lasagna:

To Assemble and bake:

Preheat oven to 400 degrees Fahrenheit. 

Over the bottom of a deep baking dish(or two), smear a layer of sauce. Top with a layer of pasta. Spread a layer of the cheese mixture, then a layer of sauce, then a layer of noodles going the opposite direction as the first layer of noodles. 

For example: ll = ll = ll = ll

Spread a sauce layer, then a pasta layer. Continue this pattern until you are almost at the top of the baking dish, lastly finish with a cheese and sauce layer, topped with a sprinkle of cheddar cheese to finish.  
  
Cover with foil and bake 30 minutes. Remove foil and bake for an additional 10 to 15 minutes.

Serves 24


Bon Appetit!
  

Tuesday, March 5, 2013

This Is What I Do

Lately my days have been filled with crafting, crafting, and more crafting!  From Save the Dates for our wedding, to numerous Preschool crafts, I have been a busy lady.

Speaking of Preschool crafts, I don't think I have talked much about what I do on a day to day basis.  I am full time student, hopefully graduating later this year.  My ultimate goal is to get my BS in Human Development, (my focus is Child Development), and to get licensed as a teacher in my state.  I want to be a kindergarten teacher.


Right now I also work part time at a "Playschool."  A playschool is just a cute name for a daycare that focuses a little on the actual academics of the children's education; mostly the children learn through play.  While I know play is a very important aspect of child development, (especially in the social and physical categories of development), I am convinced that our facility needs more structure. We, the "teachers", need more time to teach the children proper school etiquette, and basic material. I want to teach more lessons, and actually put lesson plans that I have had to create for my schooling, into practice. The problem is, there is a shortage of materials I can use to put lesson plans together at my work. This creates a lot of outside work for me, (and often a lot of extra expense), which I have to take care of in order to prepare the curriculum and activities.


Trips to the library, craft stores, internet and book research, preparing the outline for the lessons, prepping the activities, gathering supplies...it all takes so much time.  It is difficult for me to balance school and  be the best I can be at my job.


Regardless, I keep on trying to come up with a happy medium that works for me.  School always comes first, but if I only implement a few new ideas at my work a couple times a month, so be it, that's how it is going to be, and I am almost satisfied with that. I know an improvement, even if small or made slowly, is still an improvement.


This week a few nice things happened: I finished with one of my finals super early, and my tax returns came!  Because of this I was able to make a very in depth craft, that will help me create more structure during circle time, and foster more learning.

 My Circle Time Felt Weather Board


Learn the days of the week, notice the changing weather, and temperature recording! 


Happy Little Faces!
 

It is so neat that felt sticks to felt.


If you remove all the weather objects, you could tell fabric stories on the board too!


Friday, March 1, 2013

I Scream You Scream We All Scream For Ice Cream...and Updates!


Recipe Below :)

It's been far too long since my last post and so much has happened while I have been away! The planning for our Christmas themed wedding is underway, and we have started booking all sorts of wonderful arrangements for our special day. We have done everything from reserving our venue, selecting a photographer, deciding on the wedding cake design, and I have even found my dream wedding dress!  We are in the midst of finishing our Save the Dates, coordinating with musicians, and so much more.  I will have to backtrack to tell you all the details in future posts. 

*Tip: use an old ice cream container to store your homemade ice cream
Valentine's Day has come and gone, but this year I bought Jake(...well it was sort of for me too) an ice cream maker.  Dangerous, I know.   I like ice cream to be chock full of delicious bits and bobs, basically the longer the description of the ice cream, the better.  I created this recipe in hopes of concocting  the most delectable flavor, so I basically threw in all my favorites. If you have an electric ice cream maker, get ready for:


  Chocolate Caramel Cookie Custard Ice Cream...With Salted Peanuts 


Ingredients:

1 1/2 C organic whole milk
2 C organic whipping cream
1 ounce baker's baking chocolate (one square)
1 C evaporated cane juice (or other organic sugar)
1/4 C water
1 tbsp butter 
3 free range egg yolks
1/2 C salted peanuts
1 C organic "Oreos" (I like Newman-O's) with chocolate filling
*Optional: caramel sauce, chocolate sauce, chocolate caramel crumble candy (recipe below), extra peanuts

How To:

1. Stir milk and whipping cream together in a tall mixing bowl, put in refrigerator.
2. In a pot, on a low heat, melt the chocolate 
3. Pour in sugar, water, butter, and increase the heat, to medium/high, mix.
4. Continue to stir rapidly until the mixture has been bubbling for 3-5 minutes
5. Remove from heat and let cool 2 more minutes (do not let it cool all the way)
6. Stir in egg yolks
7. Remove the milk mixture from the refrigerator and pour in the warm chocolate mixture, whisk until the two are completely combined.
8. Put the bowl into the freezer for 1 hour
9. In a separate bowl, slightly crush the cookies, and stir in peanuts, put into the freezer, and wait to mix this into the ice cream batter
10. Set up your electric ice cream maker
11. Pour batter into mixer and churn according to your ice cream makers directions (before you do this you may need to strain your batter through a fine mesh strainer to avoid any egg white that may have made it into your ice cream)
12. During the last 5-10 minutes of churning pour in the prepared cookies and peanuts
13. Serve or freeze until ice cream is at the right constancy


*Tip* I save old ice cream containers so that I can save any extra ice cream I make. 


*Extra* If you have caramel or chocolate sauce handy (or you can make your own) you can mix this in at the end with the cookies and peanuts. I count the bubbling chocolate mixture as chocolate caramel. I also mixed in chocolate crumble candy to this batch. (Recipe below)


*For a 1 quart ice cream maker


 Bon Appetit!
I mixed in Chocolate Crumble Candy to this batch: 1/4 C whole milk, 3/4 C sugar, 1 tbsp butter, 1 tsp salt, 1 tsp vanilla, 1/2 ounce baking chocolate. Stir constantly on medium high heat for about 10 minutes. Mixture should be bubbling for the last 5 minutes. Cool completely in a bowl, then crumble into finished ice cream.


When it comes to ice cream, small jars are a nice way to store the correct portion size Pin It Ya'll


Enjoy!


Saturday, December 1, 2012

I Love December!


Today is the first day of December, and Jacob and I are so excited this holiday season!  We love every thing about this time of year, even the slightly annoying man ringing the very high pitched silver bell outside of Market of Choice, for the salvation army...yes it is love.

Just for fun I decided to take part in this:


And I'm off to a good start.  Jake and I pulled out all of the Christmas boxes from under the bed and began our decorating bonanza today, so there was plenty to photograph.  We didn't get everything done tonight, but we plan to put the finishing touches on our Christmas home tomorrow.  We have yet to get a tree, but that's on the agenda for tomorrow as well.  I will leave you with my first December picture. (I couldn't just pick one shot, so I stitched four of them into one; bye!)


Day 1: My View Today :)

Monday, October 29, 2012

Jack-O-Lantern Jars


For no reason at all, it seems like life has been overly busy for Jacob and I lately.  Halloween has snuck up on us faster than our sluggish bodies could keep up with.  We have neglected the pumpkin patch, we didn't make our cute couples costume, and we even missed a local symphony orchestra playing exclusively Harry Potter themed music, sick, I know.


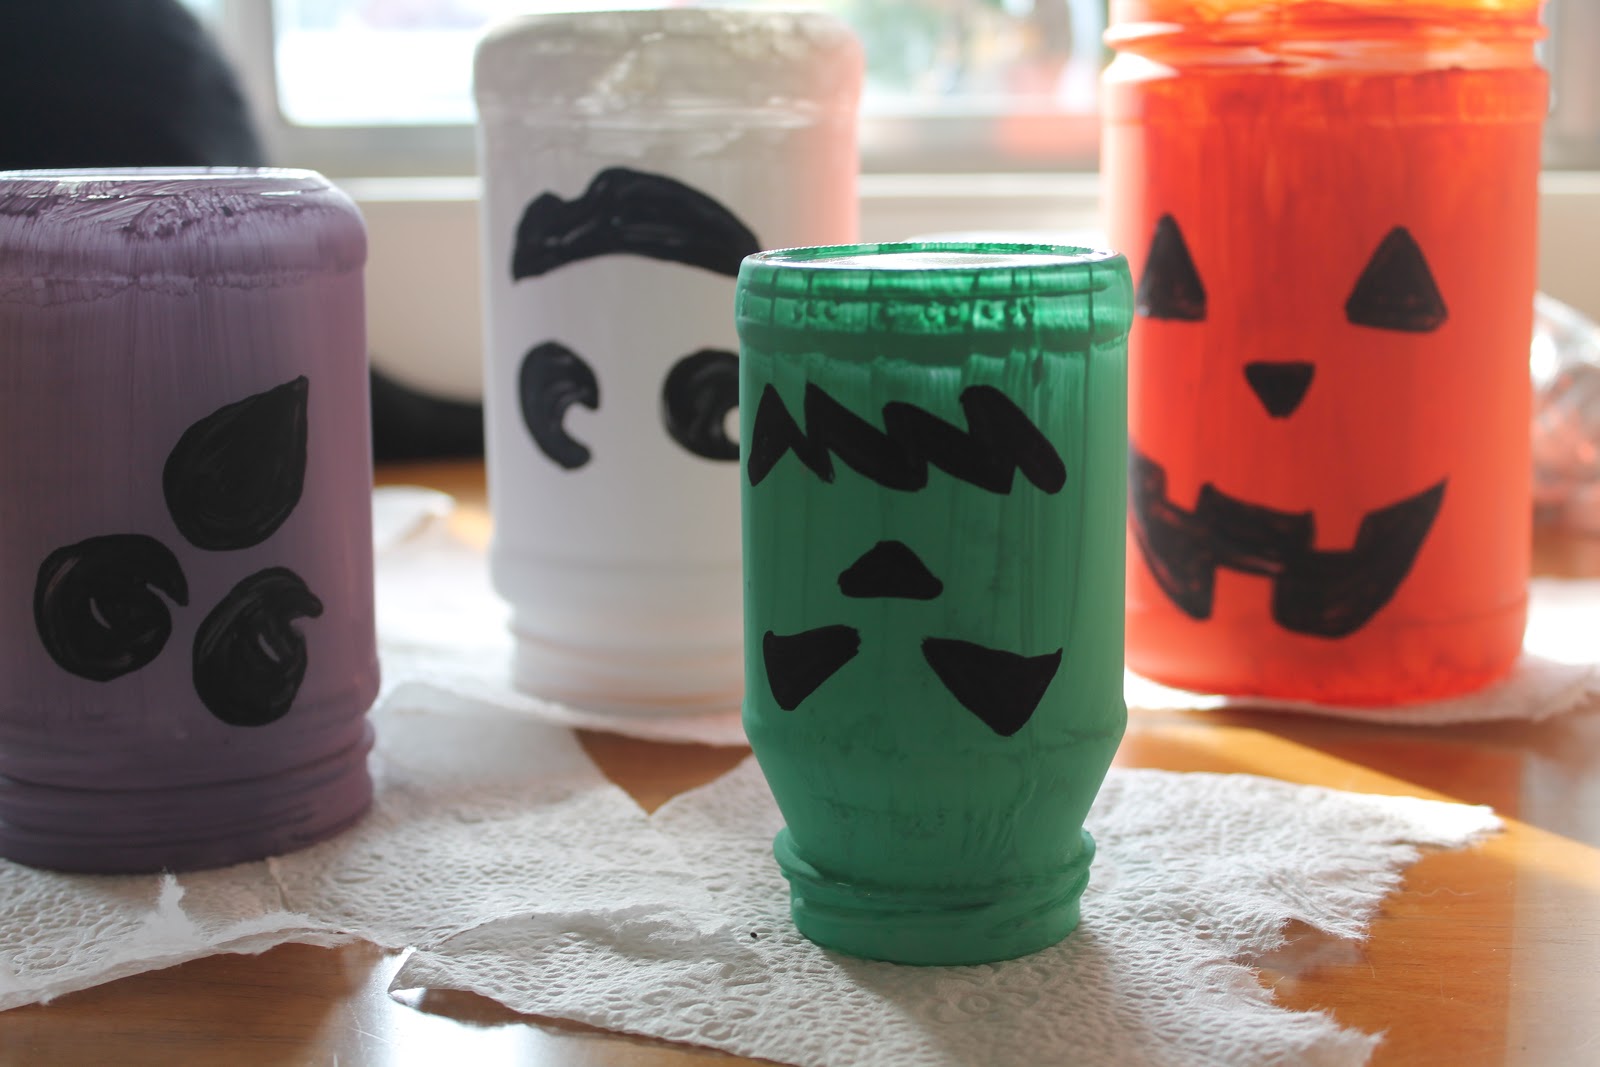
So enough is enough, back on the holiday wagon.  Jacob refused to buy any pumpkins from the store, when I suggested it he basically fainted in offense.  "Going and getting the pumpkin is all the fun...it's like the best part!"  He exclaimed to me with disgust and shock on his face. So I figured something else out for outside decoration this year.  So here they are, an adorable alternative to the jack o lantern!

Spooky Cute Halloween Lanterns:


What you will need: 

  • Glass Jars of Different Sizes 
  • Acrylic Paint
  • Brushes
  • Wax Paper
  • Tea Light Candles
  • Surface to Paint/Dry the Lanterns


How To:

First Paint your jar a solid color. Make sure your brush strokes are all in the same direction, for a tidy look.  Put a thick first coat on your jar.


 Paint the monster/ghost/cat/pumpkins face in any way you would like.  A variety of different faces looks really cute when you are finished.


 I also like to paint smaller scenes on the jars for fun.


 Likewise you can also do patterns like stripes, polka dots, zig-zags and more.


**Make sure when painting your jars you stick with Halloween colors.  For example pink or blue would not match the Halloween theme very well.


Let dry, I dried mine overnight upside-down.


Cut appropriate sized pieces of waxed paper to line your jars, and insert them like a tube (waxed side facing the inside of the jar) into the lanterns.  Place small tea light candles in the middle of each jar, and light in the dark.


**Make sure you check on the candles every so often, because a fire would not be a good thing.

 Hope you enjoy your spooky cute Halloween lanterns, happy painting!